Progress - Day 4 & 5
As the boat gets bigger and the carport gets smaller I find myself always needing the tool that is on the other side of the boat, oh well, that's life.
This weekend I managed to get frames in up to #5 and also the stringers, I am getting to the pointy end now, literally. Only difficulty was getting the keel sections tacked before I draw the bottoms up and tack to the frames, it was hard work but I managed OK on my own, blocks of wood are my best friend.
This weekend I managed to get frames in up to #5 and also the stringers, I am getting to the pointy end now, literally. Only difficulty was getting the keel sections tacked before I draw the bottoms up and tack to the frames, it was hard work but I managed OK on my own, blocks of wood are my best friend.
 |
| Aligning frames with the set-out marks using a straight edge clamped down to the hull bottoms. |
 |
| Frame #2 & 3 tacked in. |
 |
| Not sure if it actually makes a difference but I use a wound, thick copper wire extension to help transfer the ground closer to the weld area. |
 |
| Serious clamping to get the bottoms up, each clamp can put as much as 270kg of clamping pressure. |
 |
| Frames #1 to 4 tacked in. |
 |
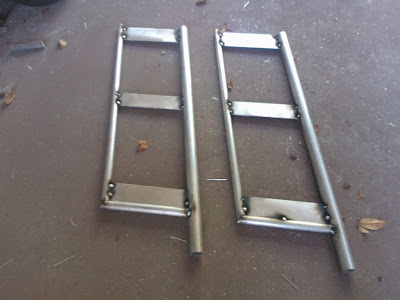
| Preparing the stringers for installing. |
.jpg) |
| Bottom plates with mill scale removed |
.jpg) | |
| Stringers installed, these stringers are full length of the hull, not intercostal, i.e. terminating between | frames. |
.jpg) |
| Another view of frames & stringers |
.jpg) |
| View of stringers at bow |
 |
| Stringers only tacked in at this stage but the bottom structure already feels rock solid to walk on. Don't go too crazy with tacking the keel too far ahead of the frames going in, it will limit you when trying to get the bottoms to form into the frames. You do need to keep a close eye on the keel joint, make sure it stays flush between plates before too many tacks go in. |
.jpg) |
| I tried to tack in the gaps between where the final welds would go, this way I can leave the tacks in place without having to worry about dressing them down to weld over later. If not possible it's probably best to put tacks in at the start or ends of a final weld rather than in the middle. |
 |
| View of stringers tacked-in at transom. I think it helps to make sure your transom will align with the bottom plates early on, try & fit-up the transom with one of the brackets as frame #1 goes in to be sure. I think if you leave the transom until later it would be too late to adjust things. No need to go overboard, just tack in one bracket, temporarily fit the transom with clamps along with the other transom brackets & ensure the transom is flush with the bottom plates i.e. 'forward of the line' per the construction drawings. Having that one transom bracket in also helps to keep frame #1 upright. |
 |
| Frame #5 going in, I tried to get the bottoms up & tacked at the keel section first. The bottoms could then be pulled up once the keel is tacked-in to conform to the natural curve of the frame profile & tacked in place section by section between stringer slots. The tacks at the chine had to be slightly larger to ensure enough strength/ penetration, the tendency is for the bottom plates to spring back to flat & I had some tacks pop and the bottoms spring back when I released the clamps! Tacks should be hot, I realised some of my tacks where too cold & weren't focused enough into the thicker 5mm bottom plate so penetration was poor. |
 |
| With rookie mistakes behind me, frame #5 is finally tacked-in! |
 |
| I had to extend the tether on my come-a-long winch with a chain and another hook but disaster struck! As I was pulling in the bottoms with the come-a-long winch using a steel hook I thought would be way strong enough, the steel hook straightened itself out under the load! The hook was made from10mm dia steel rod and had a breaking strain of 425 lbs printed on it, I should have read that beforehand! Went to Bunnings & got a big forged style hook instead! |

Comments
Post a Comment